
Node.js is an innovative and powerful tool for developers building diverse applications, from web servers to command-line interfaces. Its speed and versatility, powered by the V8 JavaScript engine, have cemented its popularity. However, there are moments when uninstalling Node.js becomes necessary, whether for an upgrade, troubleshooting, or shifting project requirements.
This guide provides comprehensive instructions on how to uninstall Node across Windows, macOS, and Linux systems. By providing detailed, step-by-step instructions, we aim to make the process as smooth and error-free as possible for developers who want to remove Node.js or even learn how to delete Node.js files.
Key Takeaways
- Node.js is an open-source, cross-platform JavaScript runtime environment that can run outside of a web browser. It can work on Windows, macOS, Linux, and other operating systems, making it widely used for modern web development and backend systems.
- Uninstalling Node.js may be needed for version upgrades, troubleshooting, environment changes, or system cleanup.
- Always back up projects and list global packages before removal, especially before commands like nvm remove or nvm uninstall.
- Windows, macOS, and Linux each have specific methods: the Control Panel or Command Prompt for uninstalling Node.js on Windows, Homebrew or manual deletion for uninstalling Node.js on macOS, and package managers or manual removal for uninstalling Node.js on Linux.
- Common issues, such as PATH leftovers, permission errors, or reinstallation problems, can be resolved with cache cleanup, environment variable checks, or the use of version managers when learning how to uninstall Node.js in Ubuntu or Windows.
What is Node.js?
Node.js is a runtime environment that allows JavaScript to run outside of a web browser. Built on Google’s V8 JavaScript engine, it enables developers to create server-side applications, command-line tools, and scalable network solutions using JavaScript. Since it’s open-source and cross-platform, Node.js works on Windows, macOS, Linux, and more, making it widely used for modern web development and backend systems.
Why Uninstall Node.js?
There are several reasons why you might find yourself needing to uninstall Node.js from your computer. These reasons often revolve around the management and maintenance of your development environment, including React Native development. Here are the most common scenarios:
- Version Upgrade: The most frequent cause for uninstalling Node.js is to upgrade to a newer version. Node.js is constantly evolving, with new features and performance improvements, which is why developers often choose to remove Node.js before installing the latest release. Upgrading ensures access to these benefits, along with enhanced security patches.
- Troubleshooting Issues: Sometimes, your Node.js installation might encounter issues due to corrupted files or conflicts with other software. Uninstalling and then reinstalling Node.js can often resolve these problems.
- Switching Environments: Developers often switch between different environments or project requirements that necessitate different versions of Node.js. In such cases, removing the current version provides a clean slate for installing the specific version required.
- System Cleanup: If you’re no longer working on Node.js projects or need to free up disk space, uninstalling Node.js helps tidy up your system, ensuring it runs efficiently. This includes knowing how to delete NodeJS files or even uninstall Node module dependencies for a complete cleanup.
Before removing Node.js from your system, it’s worth considering the uses of Node.js before making a final decision.
Preparation Before Uninstallation
Before proceeding with the uninstallation of Node.js, you must take a few preparatory steps to safeguard your development environment. Here’s what you need to do to uninstall Node across Windows, macOS, or Linux systems.
1. Backup Your Projects:
Safeguarding your work is important. Make sure all your current projects are fully backed up before you attempt to uninstall Node.js. Use a cloud service, external drive, or another storage solution to store copies of your work. This step prevents any accidental loss of data during the uninstallation process.
2. List Global Packages:
Node.js allows the installation of packages globally, making them accessible across projects. These global packages might be essential tools for your development workflow. To list all global packages you have installed, open a terminal or command prompt and run the command npm list -g –depth=0. This will display all globally installed packages at the top level, making it easier for you to note them down. Consider creating a document or a note with the list of these packages, as you may need to reinstall them after setting up Node.js again.
Uninstallation Methods (All Operating Systems):
How to Uninstall Node.js in Windows:
Uninstalling Node.js on Windows can be done through two main approaches: using the Control Panel or utilizing the Command Prompt for a more manual uninstallation. Here’s a guide to both methods:
1. Using the Control Panel
- Open the Control Panel on your Windows system.
- Click on “Programs and Features” or “Uninstall a program” under the Programs section.
- Scroll through the list until you find Node.js. Click on it to select it, then click the “Uninstall” button near the top of the window. Follow the on-screen prompts to complete the uninstallation process.
- After uninstalling Node.js, it’s a good idea to check for any remaining folders or files that may not have been removed. Common directories to check include:
- C:\Program Files\nodejs
- C:\Users\[Your Username]\AppData\Roaming\npm (for npm packages)
- C:\Users\[Your Username]\AppData\Roaming\npm-cache (for npm cache)
If these directories exist, delete them to ensure a clean Node.js uninstall.
2. Using Command Prompt (Alternative Method)
- Press Win + R, type cmd, and press Enter to open the Command Prompt.
- While the Command Prompt doesn’t directly offer an “uninstall Node.js” command for Node.js itself, you can start by removing the global packages you’ve installed. Type npm uninstall -g <package-name> for each global package you wish to remove.
- After removing global packages, you must manually delete the Node.js installation and associated directories. Go to the Node.js installation folder (usually C:\Program Files\nodejs) and delete it. Additionally, remove the npm and npm-cache directories located in C:\Users\[Your Username]\AppData\Roaming\.
- Finally, you might need to remove references to Node.js from your system’s environment variables. This can be done through the System Properties -> Environment Variables dialog, searching for and removing any variables related to Node.js (like NODE_PATH)
How to Uninstall Node.js in MacOS:
For macOS users, uninstalling Node.js can be performed through various methods, depending on how Node.js was initially installed. The process is straightforward if you use Homebrew, a popular package manager for macOS. Alternatively, if you installed Node.js directly from a package or in another manner, you might need to follow manual removal steps.
1. Uninstalling Node.js Installed via Homebrew
1. Uninstalling Node.js Installed via Homebrew
If you installed Node.js using Homebrew, you could uninstall Node.js on Mac easily with the following command:
- Launch the Terminal application from your Applications/Utilities folder or search for it using Spotlight.
- In the Terminal, type the following command and press
![]()
- This command tells Homebrew to remove Node.js from your system.
2. Manual Removal for Other Installation Methods
If you didn’t use Homebrew or need to ensure Node.js is completely removed, including all its files and directories, follow these steps:
- Open Terminal and use the following commands to remove the main Node.js directories. These commands delete the Node.js binaries, modules, and cache from your system.
- Remove Node.js binaries:

- Remove Node.js modules: cal/lib/node_modules
![]()
- You might also want to check for and remove any global npm packages or cache directories:
- Update your system’s $PATH if it includes references to Node.js or npm directories by editing your ~/.bash_profile, ~/.bashrc, ~/.zshrc, or other shell configuration files.
- Verify Removal: After deleting these directories, you can verify that Node.js is uninstalled by typing node -v and npm -v in the Terminal. If uninstalled, these commands should return an error or indicate that Node.js and npm are not found.
How to Uninstall Node.js in Linux (Ubuntu):
Uninstalling Node.js on Linux systems can be approached through the package manager provided by your Linux distribution or via manual removal if Node.js was installed from the source. Here’s how you can do both:
1. Uninstalling Node.js Using Package Manager
For Debian/Ubuntu:
- Access the Terminal by searching for it in your applications menu or using a shortcut, typically Ctrl + Alt + T.
- In the Terminal, type the following command and press Enter:
![]()
- This command will prompt for your password and then proceed to remove Node.js from your system.
- If you also want to remove npm and other related packages, you can use:
![]()
- And to clean up any unused packages:
![]()
For RedHat/CentOS:
- Open Terminal
- Type the following command and hit Enter:
![]()
- This will remove Node.js from your RedHat or CentOS system.
- Consider running sudo yum autoremove to remove any packages that were installed with Node.js and are no longer needed.
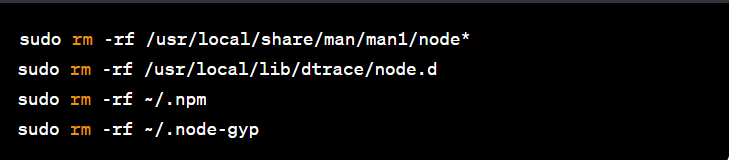
2. Manual Removal for Node.js Installed from Source
If you installed Node.js by compiling it from source, you’ll need to manually remove the binaries, modules, and other files.
- Remove Binaries: The main executable for Node.js is typically installed in /usr/local/bin. You can remove it by running:

- Remove Libraries: Node.js libraries are located in /usr/local/lib. Use the following command to remove them:
![]()
- Additional Directories: Depending on how Node.js was configured, you might also need to remove other directories, such as:

- Environment Cleanup: If you added Node.js to your PATH or set any environment variables related to Node.js, remember to remove those entries from files like ~/.bashrc, ~/.profile, or ~/.bash_profile.
- Verification: After completing these steps, you can verify the removal by typing node -v and npm -v in the Terminal. If properly removed, these commands should not return a version number but report that Node.js and npm are not installed.
Troubleshooting Common Issues
During the uninstallation of Node.js, users might encounter several issues that can hinder the process. Addressing these common problems ensures a smoother experience. Here’s how to troubleshoot some of the frequent issues:
1. Node.js or npm Still Accessible After Uninstallation
- Incomplete Uninstallation: If, after uninstallation, node -v or npm -v still returns version numbers, it likely means the uninstallation process was incomplete. Ensure all Node.js and npm files and directories have been removed, including manually deleting any leftover directories mentioned in previous steps.
- Path Environment Variable: Check your system’s PATH environment variable. If it still contains references to Node.js or npm directories, remove these paths.
- Restart Terminal or System: Sometimes, changes to the environment variables or system paths don’t take effect until you restart your Terminal or Command Prompt, or in some cases, your entire system.
2. Errors During Uninstallation
- Permission Issues: If you encounter permission errors during the uninstallation of Node.js, especially on macOS and Linux, ensure you’re using sudo (for macOS and Linux) to grant administrative privileges to your commands. On Windows, run the Command Prompt as an Administrator.
- Package Manager Problems: When using a package manager like apt-get, yum, or Homebrew, and you run into errors, try running sudo apt-get update or brew update to refresh your package manager’s database. This can resolve issues related to outdated information.
3. Unable to Reinstall Node.js
- Corrupted Installation: If a previous installation was corrupted or incomplete, clear any caches related to your installation method. For npm, you can use npm cache clean –force. For Homebrew, try brew cleanup.
Conflicting Versions: Ensure that there are no conflicting versions of Node.js or npm. Use a version manager like nvm or nvm-windows to manage multiple versions more effectively.
General Tips
- Documentation and Forums: The official Node.js website, Stack Overflow, and GitHub issues are excellent resources for troubleshooting specific errors. Often, someone else has encountered the same issue, and solutions or workarounds are available.
- Clean System Reboot: Sometimes, a clean reboot of your system can resolve lingering issues by clearing out any processes that might be using Node.js or npm files.
- Version Manager Use: Utilizing a version manager from the start can prevent many of these issues by isolating Node.js versions and dependencies from the system-wide environment, making installation, uninstallation, and version switching much more straightforward.
How Can VisionX Boost Your Business With Node.js?
VisionX has comprehensive software development services that leverage the power of Node.js. We specialize in building:
- Custom Node.js applications tailored to your specific business needs.
- High-performance, scalable solutions that can handle growing demands.
- Full-stack applications with seamless integration of front-end and back-end using Node.js.
Our team of experienced developers ensures your project is delivered on time and efficiently.
Conclusion
Uninstalling Node.js is often a necessary part of development, whether for troubleshooting, upgrades, or environment changes. While the process can seem daunting, this guide has aimed to provide actionable steps for smooth removal across operating systems.
The key is being prepared by backing up existing projects, noting global packages for later reinstallation, and understanding what directories require deletion. Each platform has its own quirks, utilizing the Control Panel or Command Prompt for uninstalling Node.js on Windows, Homebrew or manual deletion for uninstalling Node on Mac, and package managers or source uninstalls for uninstalling Node on Linux or Ubuntu.
With the proper commands and some diligence in following instructions, uninstalling Node.js can be straightforward. Common issues like permissions, outdated installers, or environment variable conflicts also have tractable solutions outlined here. Stepping through this process with care can save much frustration down the road when choosing to remove Node.js or delete Node.js completely.
FAQs
How to uninstall npm in Windows?
The npm can be removed during the process of uninstalling Node.js on Windows. After using Control Panel or Command Prompt to uninstall Node, delete the npm and npm-cache folders from AppDataRoaming.
How to uninstall Node, npm, and nvm?
You can completely remove Node.js, npm, and nvm by first using commands like nvm uninstall or nvm remove. Then, delete the remaining Node.js directories and npm cache to finish the Node.js uninstall process.
How to remove a Node using JS?
To delete NodeJS files or modules programmatically, use the fs.unlink() method in Node.js. However, to uninstall Node.js itself, follow the OS-specific steps given in this guide.
Can I reinstall NodeJS after removing it?
Yes, after you uninstall NodeJS using methods for Windows, macOS, or Linux, you can always reinstall the latest or a specific version. Using version managers like nvm makes this process easier after uninstalling Node.
How to uninstall Node.js in Windows Command Prompt?
While there isn’t a direct uninstall Node.js on Windows command, you can use Command Prompt to remove Node.js by first running npm uninstall -g for global modules, then manually deleting the Node.js installation folder and npm directories.