
React Native has emerged as a game-changer, allowing developers to craft high-quality applications for both iOS and Android using a single codebase. But as with any robust framework, managing the state of your application can be a challenge.
What is a State?
State in React Native (and in React, its web counterpart) refers to a built-in system that allows components to manage and store dynamic data that can change over time. This stateful data determines how a component renders and behaves. Here’s a breakdown of what state is and how it functions in React Native:
- Dynamic Data Storage: Unlike props, which allow data to be passed from a parent to a child component, the state is local and private to the component that declares it. This means that only the component that owns a particular piece of state can modify it.
- Mutable: The state is mutable, meaning it can be changed. Whenever the state of a component changes, the component re-renders to reflect those changes.
- Initialization: State is typically initialized in the constructor of a class component or using the useState hook in functional components.
- Updating State: A state should never be modified directly. Instead, you use the setState method in class components or the update function provided by the useState hook in functional components.
- Use Cases: State is ideal for data that is expected to change over time or in response to certain events, such as user interactions (e.g., button clicks, form submissions), network requests, or timers.
- Component Lifecycle: Changes in state can lead to lifecycle events in class components. For instance, when state changes, methods like shouldComponentUpdate, componentWillUpdate, and componentDidUpdate can be triggered.
- Local vs. Global State: While a state is often local to a specific component, there are scenarios where you might need a more global state management solution, especially for larger applications.
This is where state management libraries like Redux, MobX, and others come into play.
What is State Management?
State management in React Native refers to the methodologies and tools used to handle, organize, and store an application’s dynamic data (state) as it grows in complexity. While individual components in React Native have their own local state, the need for a more structured and centralized way to manage states across multiple components becomes evident as applications become more complex.
Each component in React Native can have its own local state. This is useful for data that’s specific to a single component and doesn’t need to be shared with others. For example, the state of a toggle switch or the text inside a specific input field.
As applications grow, you might find yourself passing state down through multiple components via props, even to components that don’t use the data but merely pass it along. This is known as “prop drilling,” and it can make the code harder to maintain.
To avoid prop drilling and to have a single source of truth for state data, react native developers often turn to centralized state management solutions. These tools provide a structured way to store, modify, and access state data from any component in the application.
Benefits of React Native State Management
State management can enhance the development process, improve app performance, and ensure a more maintainable codebase. Here are some key benefits:
Single Source of Truth
Centralized react native state management ensures a single, consistent source of data for the entire application. This reduces the chances of data inconsistencies and bugs.
Predictable State Changes
With structured state management solutions, state changes are often more predictable. This predictability can be crucial for react native app debugging and ensuring the application behaves as expected.
Avoid Prop Drilling
State management can eliminate the need to pass data through multiple layers of components (known as “prop drilling”). This can simplify the component structure and make the codebase easier to understand.
Middleware and Plugins
Some state management solutions offer middleware and plugins that can introduce additional functionalities, such as logging, persisting state to local storage, handling asynchronous actions, and more.
Interoperability
Some state management libraries are designed to work seamlessly across React (for web) and React Native (for mobile), allowing for shared logic and state management code between platforms.
5 Best React Native State Management Libraries
The most extensively used state management libraries that simplify the process of React Native app development are
- Redux
- MobX
- Context API
- Recoil
- Hookstate
1. Redux
Redux is a predictable state container designed to help you write JavaScript apps that behave consistently across client, server, and native environments. It centralizes the application’s state and logic, making state changes predictable.
How to Use Redux?
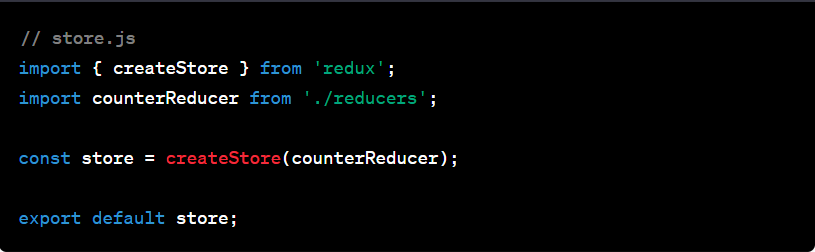
- Store: The store holds the state of the application. There’s typically just one store in a Redux app
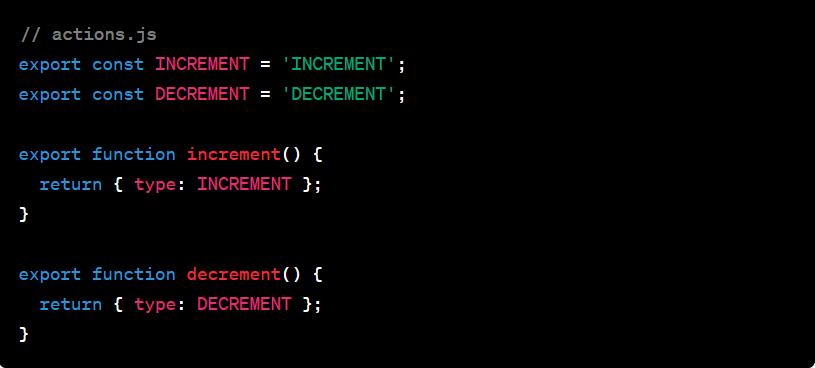
- Actions: Actions are plain JavaScript objects that represent payloads of information that send data from the application to the store.
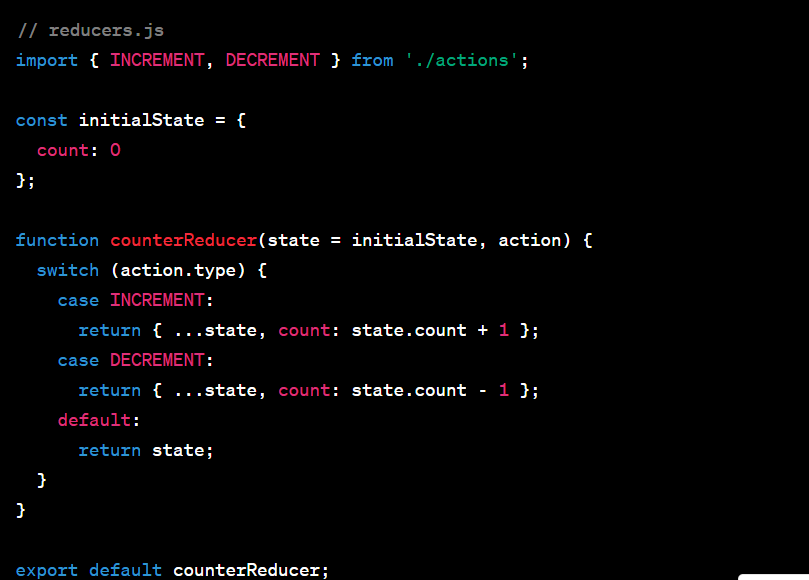
- Reducers: Reducers specify how the application’s state changes in response to actions.
- Middleware: Middleware can be used for logging, crash reporting, handling asynchronous logic, etc.
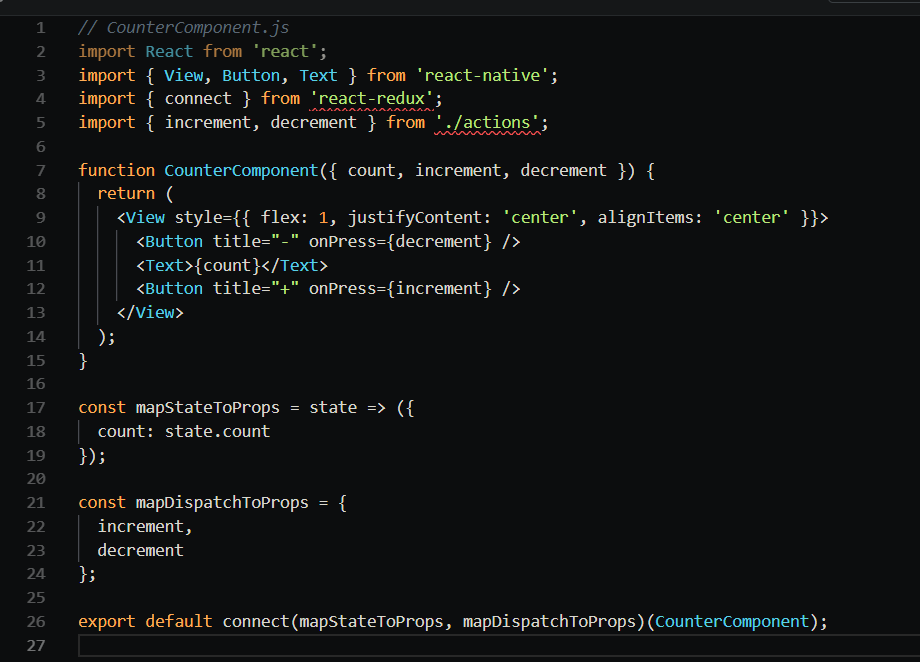
- React-Redux: This is the official React binding for Redux. It lets your React Native components read data from the Redux store and dispatch actions to the store to update data.
When to Use?
- For complex state logic that needs to be centralized and more predictable.
- When multiple components or screens need access to the same state.
- When you want to persist the app’s state.
- For tasks like logging, crash reporting, or handling asynchronous logic with redux-thunk or redux-saga.
- For time-travel debugging and state inspection.
- To maintain a consistent architecture across projects or teams.
- When dealing with complex server interactions, caching, background synchronization, etc.
Example
Actions
Reducers:
Store
React Native component
MobX
MobX is a react native state management library that makes it simple to connect the reactive data of your application with the UI. It’s based on reactive programming principles, primarily using observables, computed values, and reactions to track changes and update the UI efficiently and automatically.
How to Use MobX?
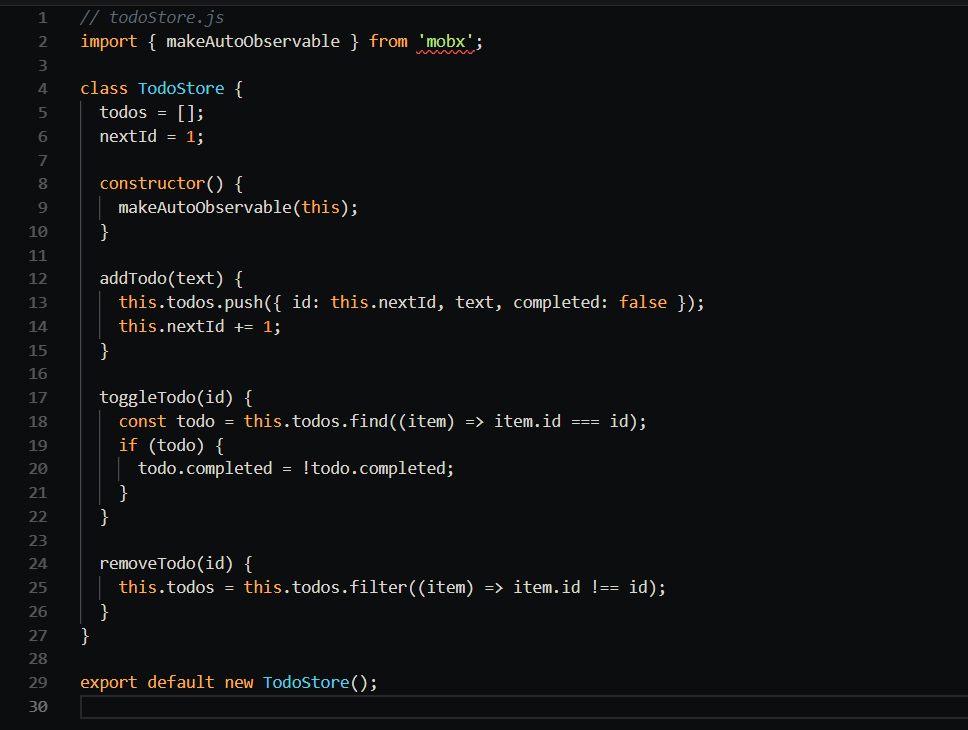
- Observables: These are the state variables that you want to track. When an observable changes, MobX ensures that all the computations or side effects that depend on them are updated.
- Computed Values: These are values that can be derived from the state. They automatically update when any observables they depend on change.
- Actions: Actions are methods that modify the state. In MobX, it’s recommended to change state only through actions.
- Reactions: These are side effects that run when observables change. They can be used for things like logging, network requests, etc.
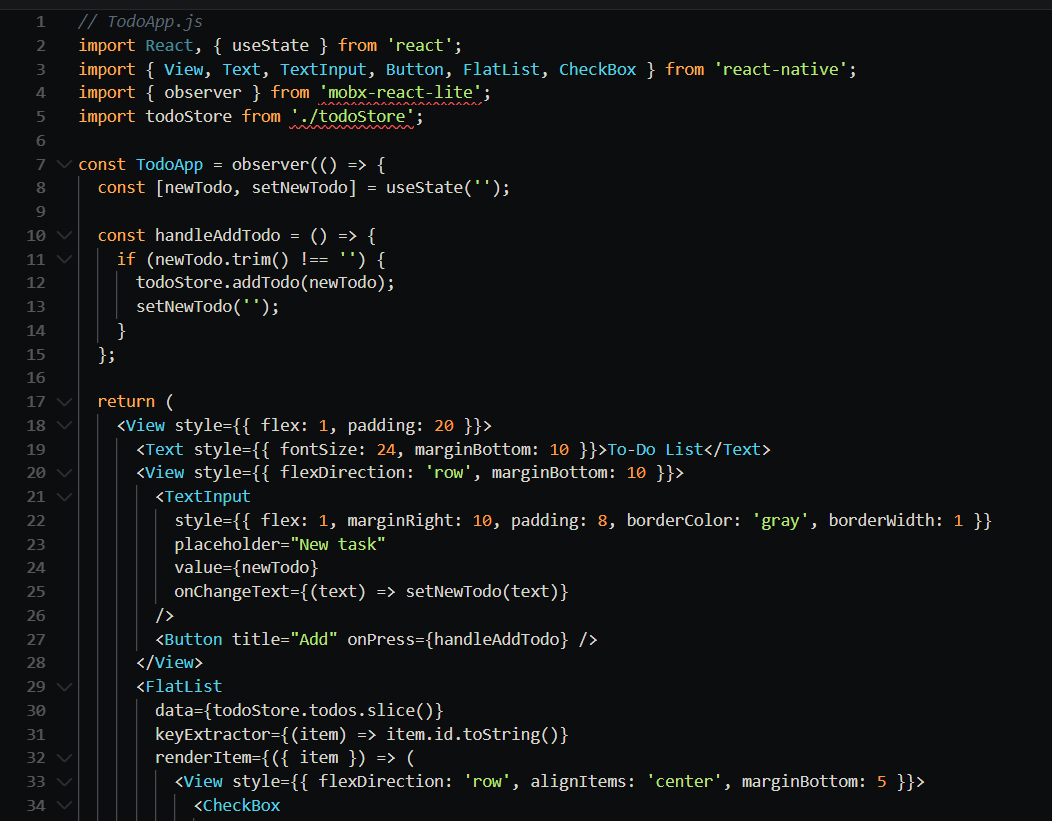
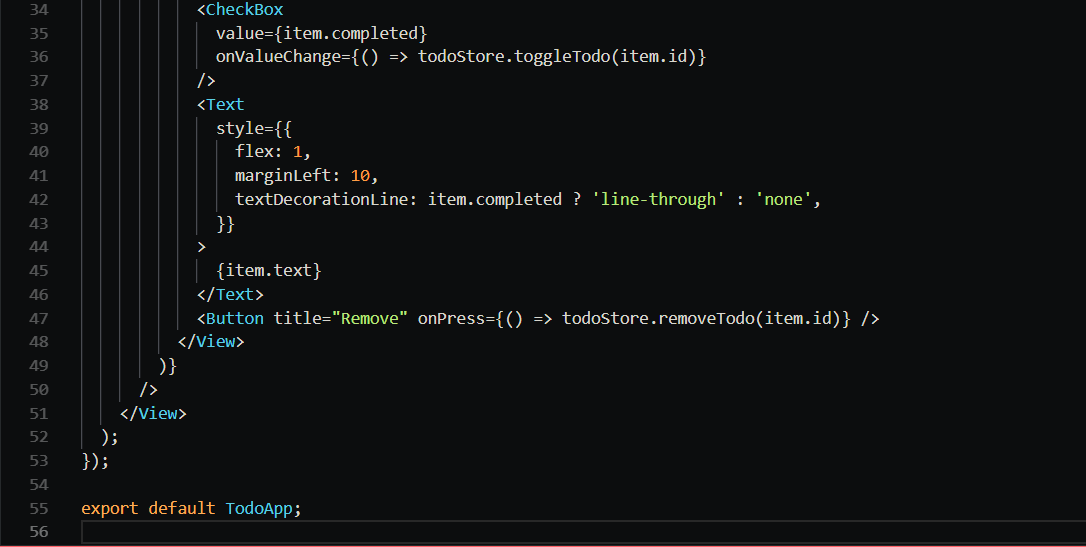
- Observer: This is a higher-order component (or hook, in newer versions) from the mobx-react (or mobx-react-lite for functional components) library that you wrap around your React components. It ensures that your component re-renders when the observables it uses change.
When to Use?
- When you want a straightforward and less boilerplate-heavy approach compared to Redux.
- When you need fine-grained reactivity.
- MobX fits well with object-oriented programming, making it a good choice if your project leans towards OOP.
- When you want automatic tracking of state dependencies without explicitly defining what should be re-rendered.
Example (To-Do list)
State Store
React Native component
Context API
Context API allows you to manage and share global states across your application without having to pass props down through multiple layers of components. It is especially useful when you have multiple components that need access to the same data or when you want to avoid prop drilling.
When to Use Context API
- When you have a state or data that needs to be accessed by multiple components across your app.
- To prevent the prop drilling problem.
- To manage global UI-related state, such as theme preferences, authentication status, or language settings.
- When your component tree becomes deep it’s cumbersome to pass props down through multiple levels.
Example
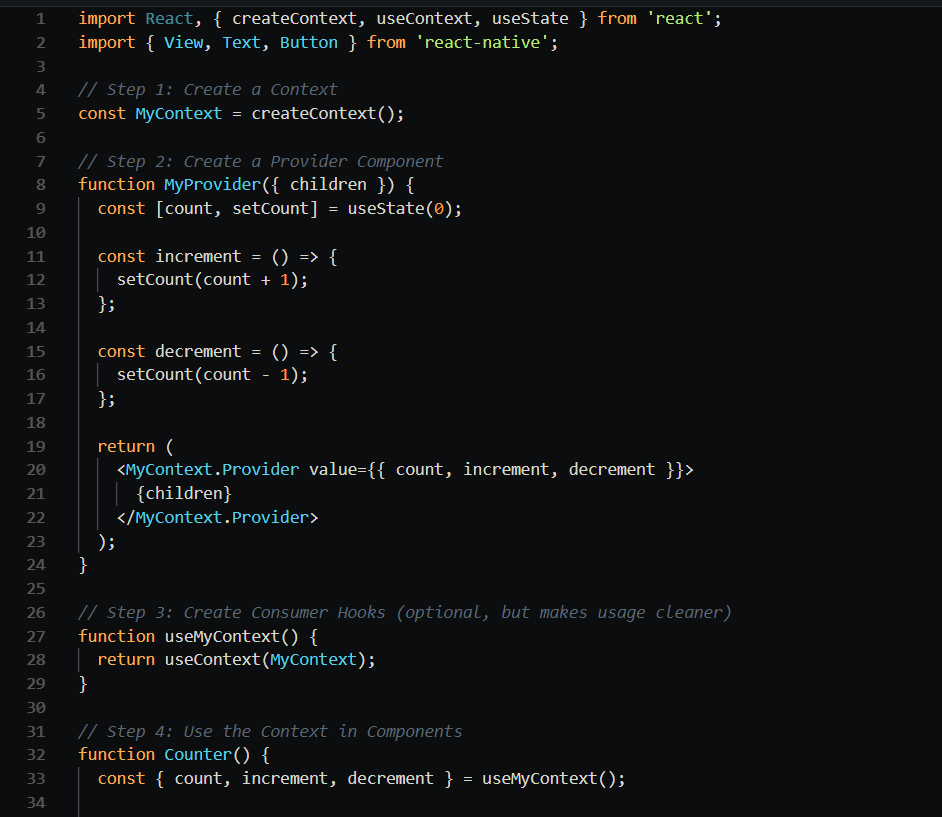

In this example:
- We create a context using createContext.
- We provide a MyProvider component that wraps our entire application and manages the state (count in this case).
- We define custom hooks (e.g., useMyContext) to consume the context and access the shared state.
- The Counter component uses the useMyContext hook to access the count state and functions to increment and decrement it.
Recoil
Developed by Facebook, Recoil is designed for managing and sharing the state in React applications, including React Native. It provides a way to manage the global application state in a more intuitive and flexible manner. Recoil is especially useful for large and complex applications where managing state can become challenging.
When to Use Recoil?
- Recoil is well-suited for large and complex React Native applications
- When you need to share state across different parts of your application
- When you have a derived state that depends on other pieces of state and needs to be synchronized automatically when the source state changes.
- Recoil can be useful for handling asynchronous data and managing loading, error, and success states across the app.
Example
Now, let’s provide a simple example of how to use Recoil in a React Native application. In this example, we’ll manage a user’s login status:
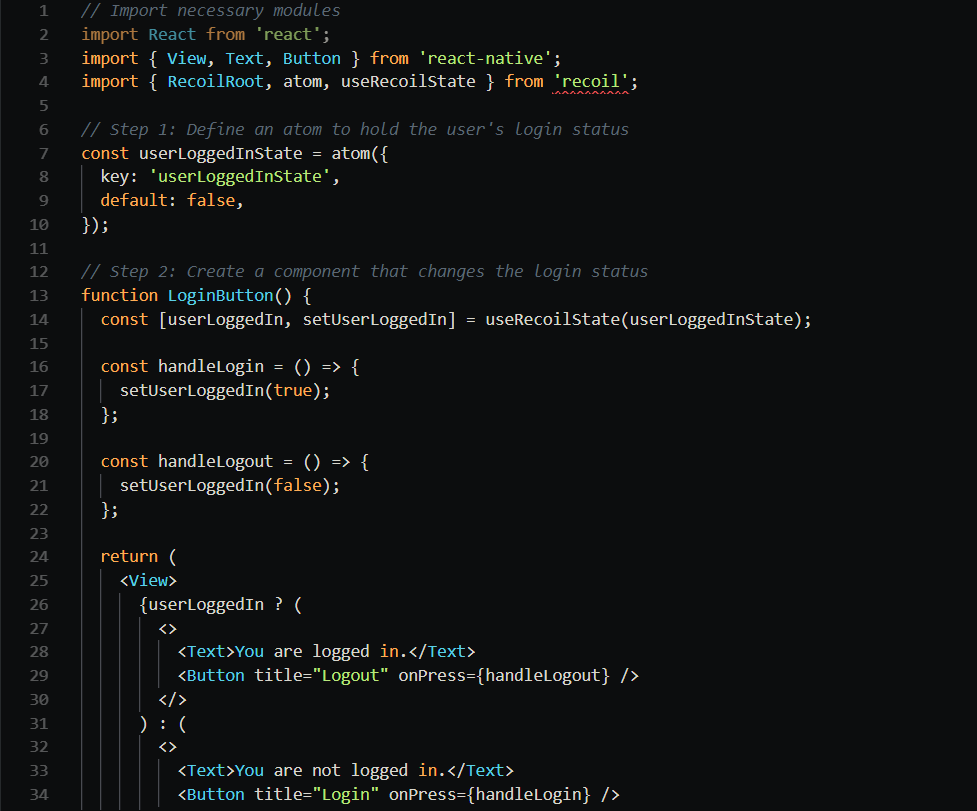
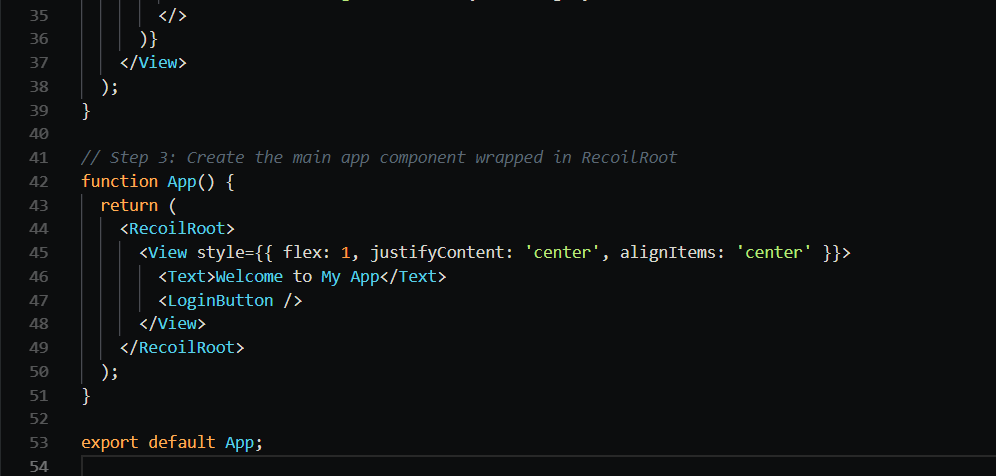
In this example:
- We define a Recoil atom named userLoggedInState to manage the user’s login status.
- The LoginButton component uses useRecoilState to access and update the login status.
- Depending on the login status, it displays either a login or logout button.
- The main App component is wrapped in RecoilRoot to provide the Recoil context to the rest of the application.
Hookstate
Hookstate is a state management library, and while it was initially designed for React, it can also be used with React Native. Hookstate provides a set of hooks for React native state management, making it intuitive for developers already familiar with React’s built-in hooks.
When to Use Hookstate?
- Hookstate is a great choice when you want a simple and easy-to-understand state management solution.
- It works well for smaller to medium-sized React Native applications.
- Hookstate excels at handling real-time data synchronization between components.
- For managing local component state, Hookstate is a lightweight alternative to React’s built-in useState hook.
- It can be a good choice for apps that need to handle updates efficiently.
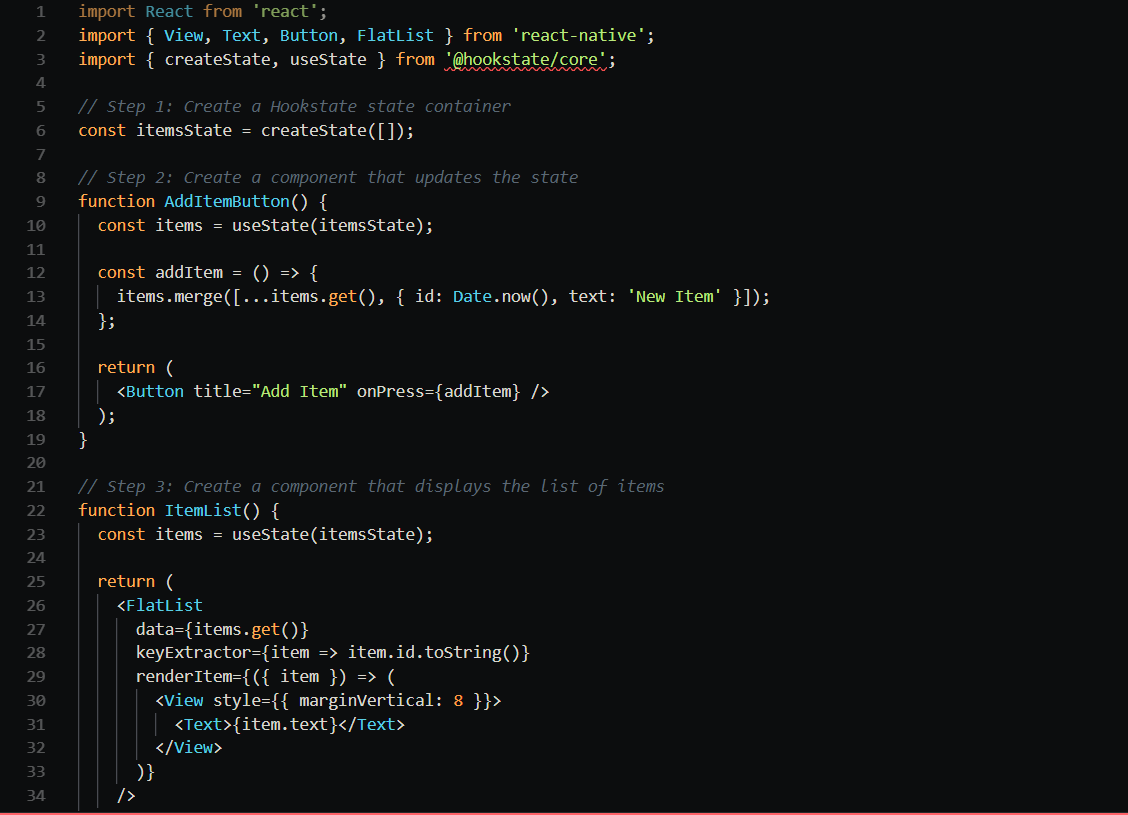
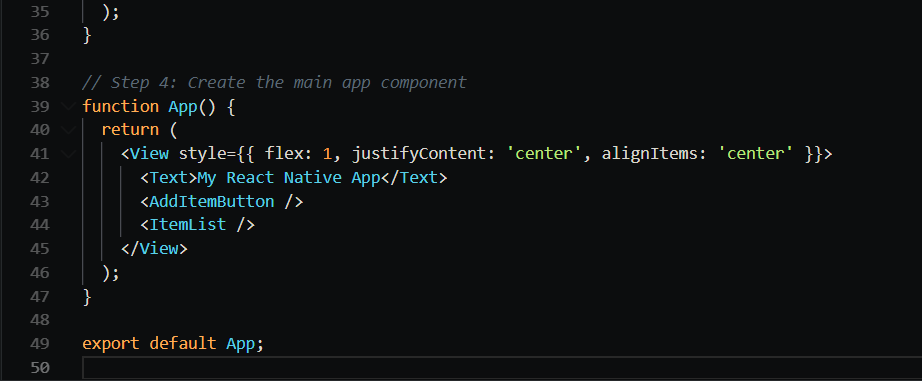
Example
Now, let’s provide a simple example of how to use Hookstate in a React Native application to manage a list of items.
First, install Hookstate using npm or yarn:

Common mistakes to avoid when using React Native state management libraries
- Not using the right state management library for your needs. There are many different state management libraries available, each with its own strengths and weaknesses. It is important to choose a library that is well-suited to the size and complexity of your application.
- Overusing state. State should only be used to store data that is essential to the rendering of your components. Avoid storing unnecessary data in state, as this can lead to performance problems.
- Mutating state directly. Instead of mutating the state directly, you should use pure functions to update state. This will help to ensure that your state is always consistent and predictable.
- Not using immutable data structures. Immutable data structures cannot be changed once they are created. This makes them ideal for storing state, as it helps to prevent accidental mutations.
- Not testing your react native state management code. It is important to test your state management code thoroughly to ensure that it is working as expected. This can be done by writing unit tests and integration tests.